Sunday, December 24, 2006

Project: Statesman Front

Always liked the Statesman fronts on a van and ute, so it was time give the WB the treatment.

If you are planning on doing this, try and get a Caprice front as they are more highly sought after than the DeVille. The Caprice front has a nice grill (all metal) whereas the DeVille has a plastic job. You can't swap them over easily.

I picked up a full walk off front on eBay (again!) for $1100. The whole thing was in great condition, and was still attached to the rest of the car. We dismantled it ourselves, which meant that we could ensure nothing was damaged.

After getting the front home, I checked things out, and realised that even though the radiator support panels are similar, I need the Statesman one fitted to the van to hold the larger headlights.

The Statesman support panel was painted white, so I spent $190 at the local painters and got it blasted, and then painted in 2-pack black. End result was pretty good!


After that, it was a case of painting the nose panel, dismantling the existing front, and fitting the new pieces.


Very happy with the end result!


For the full details of what's involved, click here to visit my old holden shed!

A big thank you to Ed for helping me pick up and
transport the new walk off front.

Tuesday, June 13, 2006

Project: Adding Flashlube

Anyone who drives and older car knows that in some cases modern fuels can be harmful to the valve seats of your engine.

The solution to the problem is to add something to your unlead fuel to help with the upper cylinder lubrication. Easy if you run petrol, a bit harder if you run dual fuel. Enter the "Flashlube" kit.

This kit is hooked up to a vacuum line on the carb of your engine to "suck" through some of the special lubricant at a steady rate, which automagically mixes with the fuel.


As the van didn't have any such kit installed, and I had no idea as to whether the heads had been upgraded for LPG and unleaded - I decided to add a kit. After all, the kit won't do any harm!

I picked one up on eBay (again!) for $35. A bargain. The kit arrived, was brand new, and it took a couple of hours to install.


The full kit

For full details on installation of the kit, click here to see the project details in my old holden shed.

Friday, May 12, 2006

Headlight Reminder

Because I'm getting older, and more forgetful, I decided to install a simple buzzer to act as a Headlight Reminder.

Not a difficult job, but it's saved me from a flat battery more than once.

The unit was a very low cost item I picked up at an electronics store, and it took me about an hour to wire it in.


Friday, May 5, 2006

Project: Rocker Cover facelift

After the success of the wiper facelift, I decided that things needed improving under the bonnet.

Check out the photo below, and you'll see what I mean:

So, I set to work with a few simple tools, and spruced up the rocker covers. While I was at it, i painted the snorkel - because I could:


If you want to see the full details of the project click here to open the project in my old holden shed. All the instructions are provided to do the job.

Wednesday, April 12, 2006

Project: Adding sill moulds

I've been on the hunt for some sill moulds which will fit along the bottom of the van.

What are they? The photo below shows the moulds as fitted to a Premier station wagon (they were standard on the Prem wagon). They are the chrome strips underneath the doors:


Sill moulds were also fitted to Statesmans - however for a panel van you need to get the wagon versions, as the Statesman moulds are about 6 inches shorter than the wagon versions. For a panel van, you need moulds which are 2080mm in length!

I bought a pair of moulds off eBay (again!) for about $75, and it cost me another $25 to have them freighted via TNT, as they were too long for Aussie Post:


After they were installed:

Click here to see the full details of how they were installed.

Monday, April 10, 2006

Project: Hole repair


In a recent entry, you saw that I replaced the guard mounted aerial with a roof mounted job. Nice work, but it left a hole in the guard which needs to be repaired. As a temporary measure I installed a plug - ugly plus!


The repair job was a simple fill and paint, and the end result was pretty good.

Saturday, April 8, 2006

Project: Chrome Door Trim

At the All Holden Day in 2006, I spotted a van which had some nice chrome door trims from Statesman. I took a picture at the time, and I've included it below:


After watching eBay for a while, I snagged a set in good condition for around $40.

Before and After Pictures:


Click here to see the full project details, including more pictures.

There's more to the story - turns out I met the owner of the van (Leigh) at a van get together in Warrnambool. Check the pictures of the All Holden Day here, and have a look at the interior of the van. Wild!

Tuesday, April 4, 2006

Statesman Mirrors

Not sure if you've noticed, but the mirrors on the van don't sit quite right. That's because they are from a Gemini, which has the same style of mirror as the WB, but a different base.


Not sure why they would have been changed bu a previous owner, but I decided it was time to get something different on there.

I watched eBay for a while, and finally bought a set of Statesman mirrors from a WB - the cable operated types. Good news and bad news. The good news is that the mirrors look great. The bad news is that the cable operated controls are not worth a pinch of s#%t.


The mounting holes in the door for the Gemini mirrors were different to the original holes, so while the Statesman mirrors went into the original holes, I now have some Gemini holes in the door I need to fix....

Thursday, March 30, 2006

New Gear Shifter Boot

After changing the gear know, I decided that the leather shroud around the gear shifter also needed to change. Compare the older photo:


To this one:


'nuff said!

Monday, March 20, 2006

Project: Knob Update

You know - I never really thought that the gear shift know installed on the old Aussie 4 speed really suited the van, so I decided to make a change.

Check the black/brown shroud. That needs to be changed too!

I hunted around some of the Auto parts stores, and found a SAAS timber look knob which matches the SAAS wheel.

Installation is a simple job, and you can click here to see the full project in my old holden shed.

I'm sure you will agree that it was a job worth doing!

Sunday, March 19, 2006

Project: Roof mounted aerial

One of the things I've always liked on HQ-WB Holden is the roof mounted aerial. So I decided the time was right. A couple of hours and the job was done.

This aerial I bought at one of the auto parts stores (can't actually remember which one!) for under $20.

I'm pleased with the end result, especially as the aerial it replaced was one of those guard mounted extendable jobs, with the spring at the base.

To see the full detail of the project (including lots of pictures) click here to open the project in my old holden shed.


You can probably just make out the temporary plug I put in the guard. Repairing the hole is Whole other project!

Friday, March 17, 2006

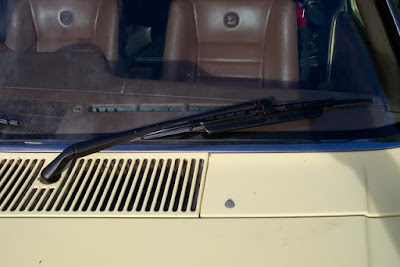
Project: Wiper facelift

Time for the first project on the van. One of the things that was very obvious from the day I picked the Panel Van up was that the wiper arms were in need of some work.

Check the original photo below:


Like I said - obvious! So I set about cleaning them up and repainting them.

The after shot:


If you want the step by step instructions as to how it was done, or just want to know how to remove the wiper arms click here to see the whole project in my oldholden shed.

I was very happy with the result, and it cost bugger all!

Tuesday, March 14, 2006

Rear Bumper

One of the things which I particularly like to change is the rear bumpers on the panel van.

The standard Holden Van has two small "bumperettes" which protect the corners of the van. They are functional, but don't look particularly good. The picture below shows another van with the standard bumpers:


I picked up (again, on good old eBay) a very used HQ Station Wagon bumper for the top price of $10.

As you can see from the above photo, the bumper had a few dents - these are easy knocked out with a block of wood and a hammer.

After an afternoon of removing the old bumperettes (rusted bolts!) and fitting the new station wagon bumper, the job was done - and the number plate flap which pulls down conceals the LPG filler perfectly.

Sunday, March 12, 2006

Early changes

While the van was in pretty good condition, there were a few things that needed to be done early on.

Early changes included:
  • Window tint - darkest legal tint on the driver and passenger windows, and ambulance tint on the carry space windows. Made a huge difference to the look! Cost: $300

  • Exhaust - The van had a set of extractors and a single pipe, which sounded LOUD, but were obviously in need of some work. We wanted twin pipes, so we Johnny Mac's exhausts in Moolap (Geelong) put together a nice set of extractors and twin system which suit the van really well. Nice work! Cost: $800

    The original exhaust

  • Stereo - the radio cassette player had to go! We wanted a good quality CD player with MP3 capability, and installed a Pioneer unit, along with some new 6" round speakers in the doors, and 6" x 9" jobs in the back. The whole thing cost about $400 - good value!

  • Spare Wheel Cover - I bought (eBay again!) a spare wheel cover in black which was from a WB Statesman. While I'm not a fan of the spare wheel being in the back of the van, I won't drive without a spare (I don't like being stranded!). At least the black one looks a bit better. Cost: $10

Thursday, February 23, 2006

The beginning

Where's the best place to start? At the beginning, so here goes! We were on the lookout for a van for quite some time - the preferred choice was a WB on dual fuel, V8 without side windows.

This van showed up on eBay, being sold by a fellow in Daylesford (Vic) who has owned and driven it for quite some years.

The photos below were taken when I went and looked at the van, before we bought it.

Standard WB front, with GTS guards


Leather Interior

Wood grain wheel, GTS DashROH Alloy Wheels


Carpet trimmed interior (with spare wheel)


After some negotiation, we paid $5,500 - which included a roadworthy. We had to wait for a couple of weeks while the roadworthy was organised, but we think it was a pretty good buy.

As you can see above, the spare wheel is in the cabin because of the LPG tank. This van is a 253 4-speed, on dual fuel!